Normal Operations
This guide aims to describe connecting and operating ATIS stations with vATIS primarily from a software perspective. Operational instructions on selecting active runway(s), ATIS responsibilities-ownership and coordination on matters involving ATIS will be covered during your ATC training and should be followed.
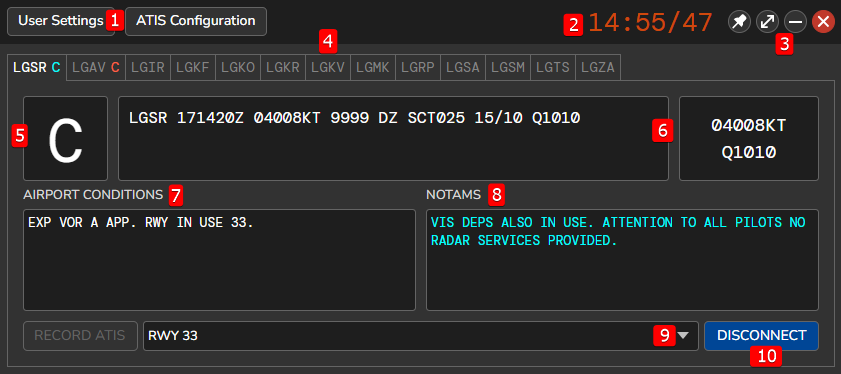
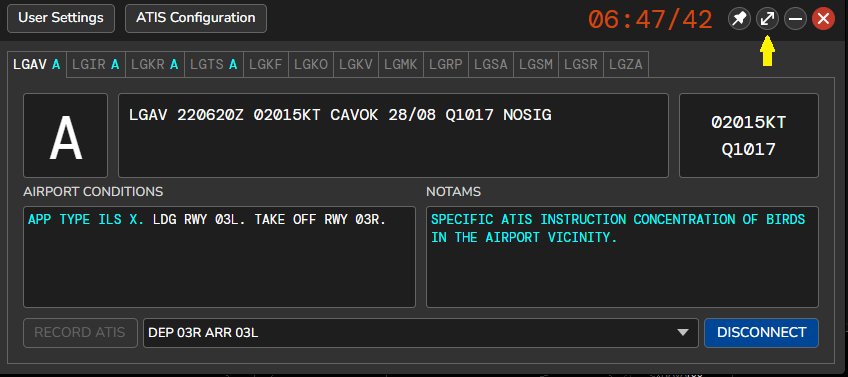
vATIS Main Window UI Legend
General
- User Settings (covered in more detail here)
- Zulu (UTC) time (format is hh:mm/ss)
- Window Controls: Pin, Mini-Window toggle, Minimize, Close (from left to right)
- ATIS Stations configured for this profile. The names coincide with the ICAO code of the airport for each station. You can click each tab to switch view to the desired station. The station currently viewed is highlighted. Depending on whether each ATIS is connected to the network or not you will notice:
- ATIS Stations with no colored letter next to them: This ATIS station is not connected and free.
- ATIS Stations with an orange letter next to them: This ATIS Station is connected to the network and owned by someone else.
- ATIS Stations with a cyan letter next to them: This ATIS Station is connected to the network and owned by you.
Specific to currently viewed ATIS Station
5. Current ATIS letter. Left-click cycles it forwards, right-click cycles it backwards (for stations not owned by others).
6. Latest METAR for this airport
7+8. Airport Conditions and NOTAMS Fields. These will vary depending on the selected config. Preconfigured activated messages are shown in cyan.
9. Dropdown list of available configs for this airport. Selected config is displayed inside the box (empty if no selected config).
10. Connect/Disconnect ATIS Station.
Connecting an ATIS Station
According to VATSIM Policy, as a controller you are allowed to connect ATIS only at the airport(s) that you control and up to 4 ATIS stations maximum. These airports must also have ATIS in real life as well.
In addition, under no circumstance shall a controller signed on as a tower, ground or delivery controller provide ATIS for any aerodrome other than their primary airport.
In general, connecting an ATIS station with vATIS involves 3 steps: Selecting the appropriate config, checking the specified active Airport Conditions/NOTAMs and finally connecting the station to the network.
1. Selecting Config Preset
In your opened profile, go to your desired station (LGAV in this example) and click on the config selection dropdown list.
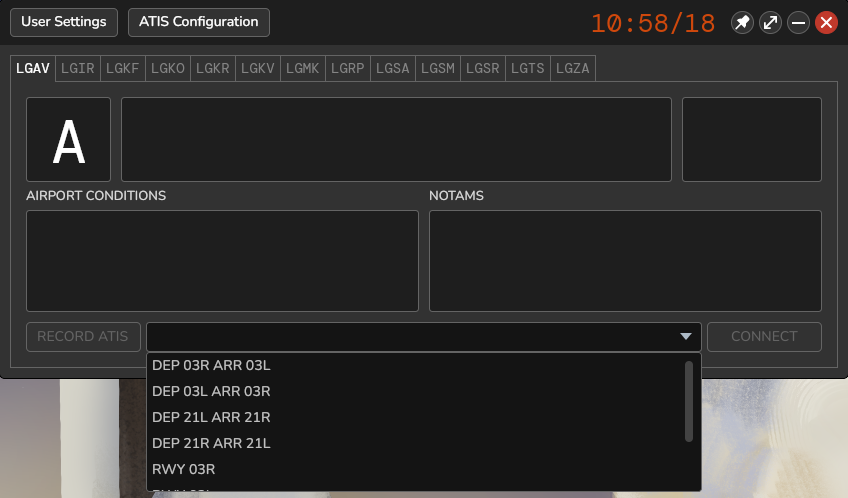
A list of config presets will appear for the airport in question. You can also scroll through available presets with the scrollbar to the right of the list (or mouse scroll wheel). Once you have decided on the appropriate config to use, click on it to select it.
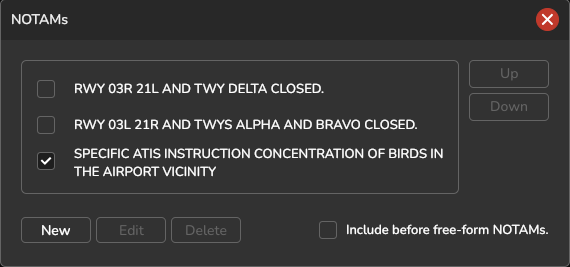
2. Checking Airport Conditions/NOTAMs

Once a config is selected, you will see it displayed in the box from where you opened the dropdown list. Depending on the airport and the config you selected, you will notice the Airport Conditions and/or NOTAMs fields populate. If this is your first time doing this, they will contain the predefined information for each config. Otherwise, they may also contain conditions/notices that you activated or entered in each box during a previous session as these changes persist automatically. Here's the important part: As a responsible controller, you must verify that what you see here is correct, there is no crucial info missing and that there isn't any irrelevant info that could be misleading.
To toggle predefined Conditions/NOTAMs click the respective label above each box. A window will open where you can toggle them using checkboxes.
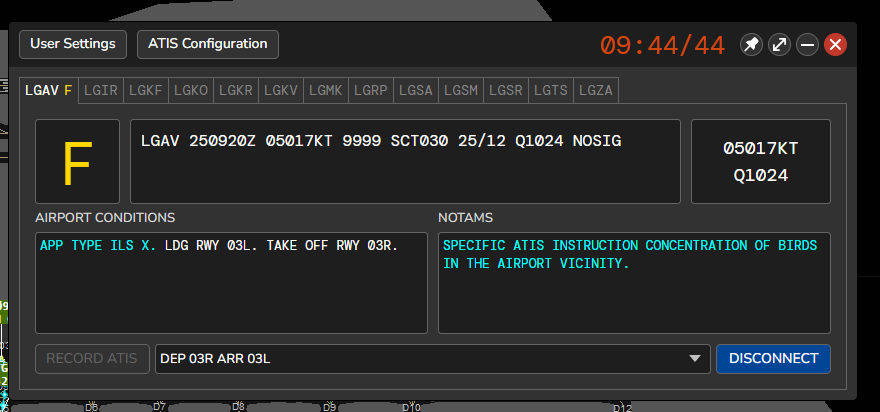
3. Connecting to the Network
To connect an ATIS station, you must first have connected to the network as a controller (with EuroScope).
When everything has been set correctly and the required ATC coordination has been done, the ATIS station is ready to be connected. To connect it, click the Connect button on the bottom right corner of the main window. Connected ATIS stations owned by you will have their current information letter next to them in cyan and a blue Disconnect button.
ATIS Updates while Connected
1. Automatic Updates
When a new METAR update is available, vATIS will update the ATIS and cycle the ATIS letter forwards automatically. The ATIS letter for the corresponding ATIS Station will blink. If you have enabled notification sounds, you will also hear a notification sound. To acknowledge the ATIS update, left-click the blinking letter in the respective ATIS station tab once.
2. Manual Updates
Updates to operational information such as runway config, airport conditions, NOTAMs etc. must be carried out manually after being coordinated. In these cases, perform the changes as described in Connecting an ATIS Station. When ready, cycle the ATIS letter forwards by left-clicking on it. The updated ATIS information will go live automatically.
Using vATIS Mini-Window
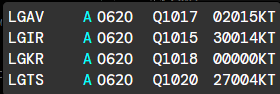
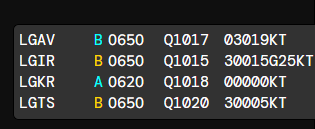
The Mini-Window offers a streamlined display of the current ATIS letter, wind, and altimeter for connected ATIS stations. Stations you are hosting will have a cyan ATIS letter while other stations will be shown in orange. Like any window, it can be dragged across the screen to position it according to your preference.
Automatic ATIS updates can also be acknowledged from the Mini-Window by clicking the respective blinking letter:
To enable the Mini-Window click the respective toggle button from the main window:
The Mini-Window can be controlled by right-clicking anywhere on it. This opens a context menu with various options (see the legend below):
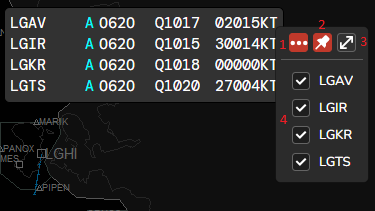
- Hides detailed ATIS information for a more compact view. In this view only the ICAO code and ATIS letter are visible:

- Pins the Mini-Window. This can be used to always keep it on top (e.g. have it visible even when using EuroScope).
- Restores the full vATIS Main Window. The Main Window can also be restored by double-clicking the Mini-Window,
- Filters ATIS Stations. Unchecked stations are hidden from the Mini-Window.

Disconnecting an ATIS Station-Change of Ownership
To disconnect your own connected ATIS stations, go to the desired station from the main window and click the Disconnect button on the bottom right corner.
However, if the specific ATIS station is to be inherited by the next controller you must coordinate with them first so that they can take over the ATIS correctly. This procedure of changing of ownership is usually as follows:
- The controller disconnecting the ATIS station notifies the next controller and communicates any significant information and current ATIS letter. When coordination is complete, the ATIS station is disconnected.
- The controller inheriting the ATIS station performs the steps of Connecting an ATIS Station up to step 2 appropriately as coordinated and manually cycles the ATIS letter to the current or next letter depending on whether there is a change or not.
- The final step is performed and the ATIS station is connected.